scale-tone
DynamoDB + ElastiCache + Linq2DynamoDB + Ionic. Practice. Mobile Client.
In my previous post I showed, how to take advantage of Linq2DynamoDB for creating an OData resource, that stores data in AWS DynamoDB and caches them in Redis. Now let’s consume that OData resource from JavaScript code. We’ll build a simple yet multi-platform MobileNotes application with Ionic framework. Ionic is really brilliant, because it allows you to create templates for mobile JS-based applications in minutes and brings you all the most wanted JavaScript libraries out-of-the-box.
To create the Ionic app template with Visual Studio 2015, just go to File->New->Project… and in the appeared New Project dialog go to Installed->Templates->Other Languages->JavaScript->Apache Cordova Apps tree node:
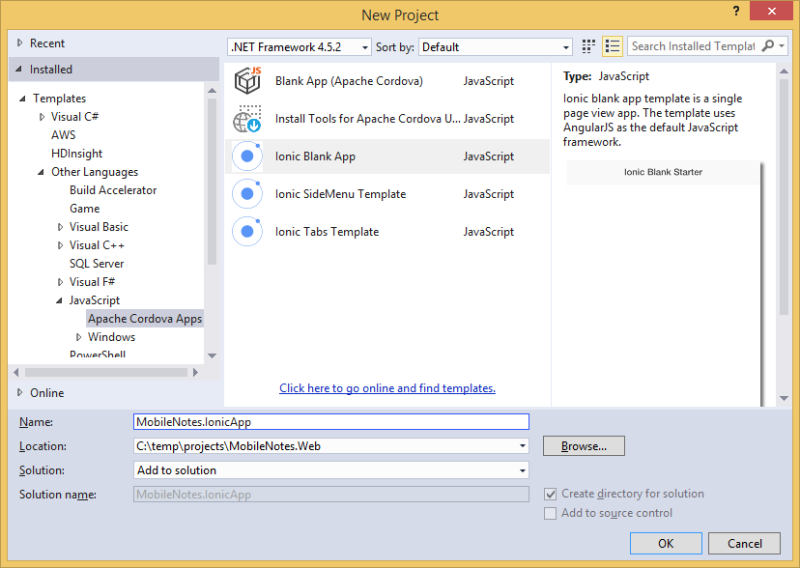
Select the Ionic Blank App template (if you can’t see this template there, then you would need to install it first, as described here), name your project MobileNotes.IonicApp and press OK. You could also create the Ionic app template with Ionic CLI and use any other IDE for writing further JavaScript code.
Ionic app template, that you just created, already contains all major libraries like jQuery, Apache Cordova and AngularJS, but it doesn’t contain AngularJS ngResource module. So, you need to add this module to your project, e.g. via Bower. Just make your bower.json file look like the following:
{
   "name": "ionic-blankapp",
   "private": true,
   "devDependencies": {
      "ionic": "driftyco/ionic-bower#1.2.4",
      "angular-resource": "1.4.3",
      "bootstrap": "3.3.4"
   }
}
This will add packages with ngResource and also with Bootstrap (which I prefer to use in HTML markup instead of Ionic CSS). Visual Studio will automatically restore those missing packages for you.
Now open the app.js file and add an AngularJS controller called maincontroller to the end of it:
.controller('maincontroller', ['$scope', '$resource', '$http', '$q', function ($scope, $resource, $http, $q) {
   // here goes the controller code
}])
Now define a resource inside your maincontroller:
var noteResource = $resource
(
   'http://your service address>/NotesDataService.svc/Notes', {},
   {
      query: {
         method: 'GET',
         isArray: false,
         params: {
            '$orderby': 'TimeCreated desc',
            '$filter': 'TimeCreated gt DateTime\'2016-02-01\''
         }
      }
   }
);
NOTE: we only had to override the query method of the resource here. All other methods will work with our OData resource unmodified. Unsetting isArray flag is necessary, because WCF Data Services return a single scalar object instead of an array (the actual array of resulting entities is returned in that object’s ‘d’ field). The params field contains the parts of the OData query, that will be sent to the service (and will be converted to a QUERY operation against your DynamoDB table eventually). Let’s load and show Notes created after the 1-st of February 2016 and sorted by creation time as an example.
Now you will need to obtain OAuth2 credentials (ClientId, ClientSecret and RedirectUri) for your app by registering a project with Google Developers Console (here is also some documentation for your reference). This is how Google Developers Console should look like after you’ve done with registration process:
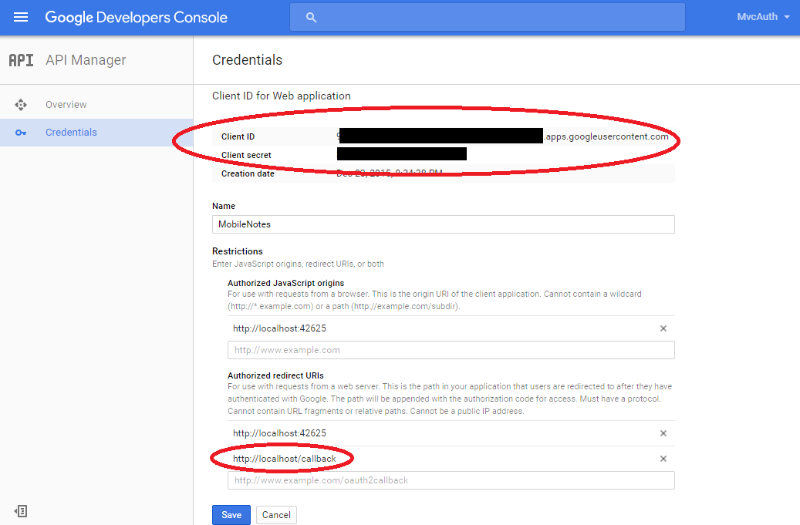
Paste ClientId, ClientSecret and RedirectUri constants to your code with the following JSON:
var authConstants =
{
   GoogleClientId: '[your app's Google ClientId]',
   GoogleClientSecret: '[your app's Google ClientSecret]',
   GoogleRedirectUri: 'http://localhost/callback'
}
NOTE: RedirectUri will not be used in our application, so it doesn’t need to point to something real. It just needs to be a valid URI.
Now add the following function inside your maincontroller:
var getIdToken = function () {
   var deferred = $q.defer();

   var uri = 'https://accounts.google.com/o/oauth2/v2/auth?client_id=' + authConstants.GoogleClientId + '&redirect_uri=' + authConstants.GoogleRedirectUri + '&scope=email%20profile&response_type=code';

   var inAppBrowser = window.cordova.InAppBrowser.open(uri, '_blank', 'location=no,clearsessioncache=no,clearcache=no');
   inAppBrowser.addEventListener('loadstart', function (event) {

      if ((event.url).indexOf(authConstants.GoogleRedirectUri) !== 0) {
         return;
      }

      inAppBrowser.close();

      var accessCode = event.url.split('code=')[1];

      $http({
         method: 'POST',
         url: 'https://www.googleapis.com/oauth2/v4/token',
         headers: { 'Content-Type': 'application/x-www-form-urlencoded' },
         data: 'code=' + accessCode + '&client_id=' + authConstants.GoogleClientId + '&client_secret=' + authConstants.GoogleClientSecret + '&redirect_uri=' + authConstants.GoogleRedirectUri + '&grant_type=authorization_code'
      }).then(function (response) {

         $http.defaults.headers.common['Authorization'] = 'JsonWebToken ' +    response.data.id_token;
         $http.defaults.headers.common['Accept'] = 'application/json';
         deferred.resolve();
      });
   });

   return deferred.promise;
}
The getIdToken() function runs the user through Google OpenID Connect authentication process and returns the ID token. The function uses the cordova-plugin-inappbrowser plugin, which you should also add to your project, either by opening the config.xml file with Visual Studio editor:

or by manually editing that file.
After the ID token is successfully obtained, it is added to the list of default HTTP headers passed to the server with each further $http request. NOTE: this very simplified implementation is intented to just show the main idea. In real-world project it might not be acceptable, because you probably wouldn’t want to send the user’s ID token with each AJAX request, that your code is making.
Now add a function for logging in and loading the list of existing notes:
$scope.login = function () {

   $scope.errorMsg = '';

   getIdToken().then(function () {

      $scope.isLoggedIn = true;
      $scope.notes = noteResource.query(function () { }, function (err) {
         $scope.errorMsg = err;
      });

   }, function (err) {
      $scope.isLoggedIn = false;
      $scope.errorMsg = err;
   });
}
The last function to implement is the function, that adds a new note:
$scope.addNote = function () {

   $scope.errorMsg = '';

   var newNote = new noteResource();
   newNote.TimeCreated = new Date();
   newNote.ID = newNote.TimeCreated.getTime().toString();
   newNote.Text = this.newNoteText;

   newNote.$save(function (result) {
      $scope.notes.d.unshift(result.d);
   }, function (err) {
      $scope.errorMsg = err;
   });
}
Here we use the number of milliseconds since the UNIX epoch as an ID for the new note. And if the note was successfully sent to the server, it is added on top of the list.
Finally, the HTML markup is needed. Replace the <body> tag in your index.html file with the following:
<body ng-app="starter" ng-controller="maincontroller">
    <div ng-view class="container push-right">
        <div class="panel panel-default">
            <div class="panel-heading">
                <a class="google-sign-in btn btn-block" ng-click="login()">
                    <span class="btn-copy">Sign in with Google</span>
                </a>
            </div>
            <div class="panel-body" ng-show="isLoggedIn">
                <div class="col-xs-12">
                    <div class="input-group">
                        <input type="text" class="form-control" ng-model="newNoteText">

                        <span class="input-group-btn">
                            <a class="btn btn-default" ng-click="addNote()">Add</a>
                        </span>
                    </div>
                </div>
            </div>
            <div class="panel-footer">
                <div class="alert alert-danger" ng-show="errorMsg"></div>
            </div>
        </div>
        <ul class="list-group">
            <li class="list-group-item" data-ng-repeat="note in notes.d">
                <h4 class="list-group-item-heading"></h4>
                <p class="list-group-item-text"></p>
            </li>
        </ul>
    </div>
</body>
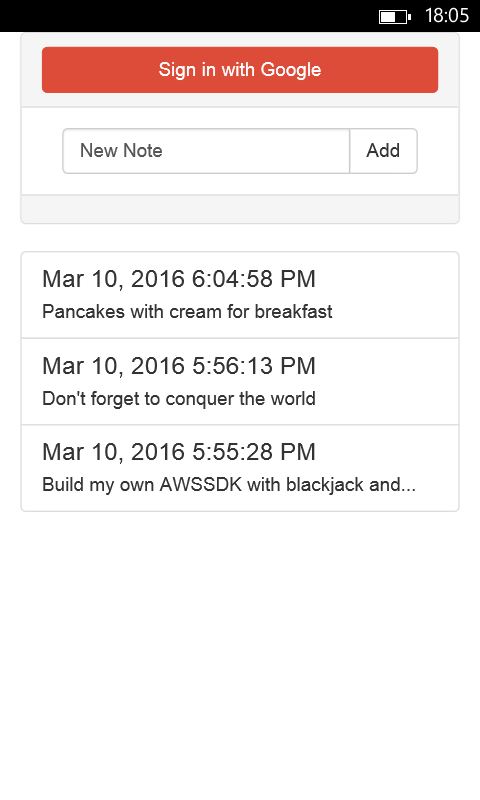
NOTE: I was using Bootstrap’s CSS instead of Ionic’s one just because Ionic apps still do not look well on my Windows Phone. While Bootstrap looks quite OK:
The complete source code of this sample project can also be found on GitHub.
Wrapping Up
So, in this series of posts I was trying to show, that it quite OK to combine such diverse technologies as DynamoDB, Redis, .Net, OData, Ionic and AngularJS in one single project and that it really doesn’t require much effort and tons of lines of code. Each and every component can do exactly what it’s best suitable for and all components can perfectly compensate each other’s drawbacks. Isn’t that cool? What do you think?